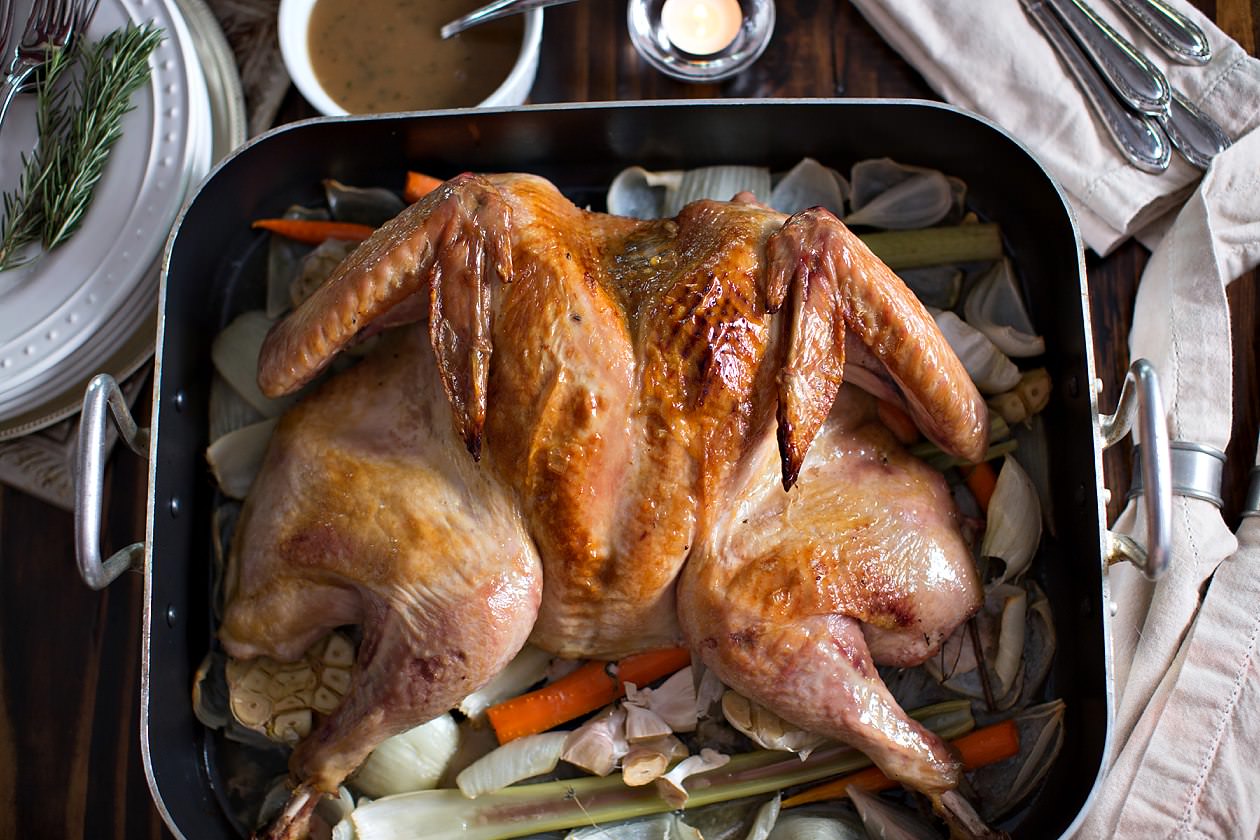
So Jeff and I spatchcocked a turkey yesterday… and yes, we giggled every time we said the word.
A spatchcock is a turkey, chicken, or other poultry that has been flattened for grilling or roasting. Yes, flattened. There is no better descriptor, folks, than flattened. You remove the backbone of the bird, then stick your hand on the breastbone, and press down – hard – until it flattens like a little furry bear rug. Then you roast it.
I found an article and recipe on this method in Bon Appetit, and just couldn’t resist giving it a try for Thanksgiving this year. The article said that flattening the bird allows the meat to cook faster at a higher temp, so the skin becomes crispy without drying out the meat. It’s supposed to give the perfect balance of juicy breast meat, well done dark meat, and delectable skin, and it only takes about 90 minutes to roast! So Jeff and I picked up a turkey for a practice run, and took a stab (more like a slice) at spatchcocking. Of course, you can also have your butcher do this for you, but we had to try it ourselves at least once… Also, I should note that you need to use a small turkey for this method, about 12-14 lbs. Larger turkeys don’t do as well.
Just a note to everyone that we used the entire Bon Appetit recipe to season and cook the bird, but you can use any recipe you’d like once you’ve flattened your turkey. If you’re going to go with the BP recipe, though, keep in mind that it asks you to chill your bird overnight for 6-18 hours with the salt seasoning applied, so this is a day-ahead recipe and definitely NOT a day-of. We also made the Roasted Poultry Stock for the Rich Turkey Gravy (both from Bon Appetit) using the parts from the spatchcocked turkey, and it was DELICIOUS (put fresh thyme in the gravy at the very end – BONKERS GOOD).
Another quick disclaimer dear bloggy-blog – because spatchcocking is a form of butchering, there are going to be photos below of raw poultry and a turkey with a missing backbone. Normally, I wouldn’t show these photos, but well, it’s kind of the point of today’s post. So if you have a sensitive stomach and are reading this while eating breakfast or snacking on brunch or enjoying an afternoon tea or otherwise tasting delicious food, consider yourself fully warned before reading on…
Ok, I promise I’ll make this part quick. After removing the neck and giblets from inside the bird (put them aside), grab a pair of strong poultry scissors or an electric knife to cut down both sides of the backbone.

(Again, gross photo alert…) Cut from one end of the bird to the other, removing the backbone entirely. After I made a few cuts myself with the scissors, I made Jeff get out the electric knife and do the rest for me while I cringed from the corner of the kitchen. The scissors definitely weren’t strong enough. Put the backbone with the neck and giblets, and set aside.

Once the backbone is removed, look inside the turkey and find the dark, oblong keel bone. It’s right in the middle of the breast, so poke around until you feel it – it’s surrounded by soft meat and I was actually surprised at how easy it was to identify (I didn’t do so well in anatomy class). Use the tip of a sharp knife and score along both sides of the keel bone. Cutting along both sides of this bone help the bird to flatten.
Now comes the fun part… Turn the turkey around so it’s skin side up, place your hand in the middle of the breast, and press down HARD – like you’re giving the turkey super overzealous CPR. In the polite words of Bon Appetit, “You should hear a crack and feel the bones give way” as the bird flattens into a shapeless pile. I just about fainted into a shapeless pile when Jeff flattened this guy.

Ok, now we’re ready to season and cook the bird, so we get to enjoy some innocently pretty photos with delightful colors and textures instead of dead poultry skin and cracked bones. First, you’ll make your spice rub for the skin of the turkey, so start by zesting an entire orange and then half of another, keeping enough orange peel in tact on the second one to cut four big strips off tomorrow. You’ll also need to toast the anise seeds in a skillet for 2-3 minutes until they’re fragrant and remove the rosemary and thyme from their sprigs (keep the sprigs though – you’ll need them the next day with the veggies. Aren’t you glad I’m around to tell you these things?).
Toss all of the seasonings (kosher salt, orange zest, brown sugar, rosemary, thyme, black pepper, and 4 tsp of the aniseeed) into a food processor and finely chop.

Now you have a delicious spice rub to slather all over your turkey.

We made the mistake of rubbing the turkey with the salt rub while it was still on the cutting board and then transferring it to a baking sheet to chill overnight. Next time, I’ll get the turkey in place on a short rack on a baking sheet first, and then rub it with the seasonings. A bunch of seasonings fell off during the transfer, and we had to re-rub a bunch of it on anyways. Let your turkey chill for 6-18 hours (I LOVE do-ahead recipes for holiday meals. In fact, all of my holiday recipes this year are do ahead, which cuts down on day-of prep and stress a TON.)

Side Recipe: Once you put your turkey in the fridge to chill, use the backbone, neck, and giblets to make the Roasted Poultry Stock for the Rich Turkey Gravy. The stock is insanely delicious and definitely worth the effort instead of using a store bought stock. This was the first time Jeff and I made a homemade stock (it was a day of experiments), and we are officially believers in the process! The stock is a make-ahead recipe, and can be chilled for three days or frozen for up to three months.
When you’re ready to start roasting your turkey the next day, preheat your oven to 450 degrees and chop your veggies, placing them in your roasting pan with the sprigs from the herbs and three heads of garlic cut in half. Take the turkey out of the fridge and rinse it completely, getting rid of the spice rub entirely. Put the turkey directly on top of the veggies and let it sit at room temperature for 30 minutes.

Once your turkey has rested and your oven is heated, heat up a half cup of olive oil with the four zest strips from your orange and the remaining toasted aniseed. Cook until the oil is sizzling – about two minutes. This is the oil that you will brush on your turkey while it’s cooking.

Brush your turkey with the oil, put a half cup of water in the bottom of the pan, and put it in the oven to roast for 30 minutes at the high heat. This will do the initial crisping of the skin.

Once the turkey has roasted for 30 minutes at 450 degrees, turn the oven down to 350 degrees, and continue to roast until it’s reached an internal temp of 165 degrees, which should take at least another hour. Brush the turkey with oil every 20 minutes. It should come out perfectly golden and crispy brown! Once it’s out of the oven, tent the bird with foil and let rest for 30 minutes. Please don’t cut into the meat right away, my friend, or you risk losing all of the juiciness you’ve worked so hard to achieve. I’m begging you on this one. Use the drippings in the pan plus the Roasted Poultry Stock to make your Rich Turkey Gravy, and you have a Thanksgiving meal folks will be raving about for years!
Side note: If you’re having a large number of guests, Bon Appetit recommends purchasing another small 12-14 lb turkey and roasting two birds instead of buying a bigger turkey. Again, larger turkeys don’t do as well with this method.
The verdict: I love that this turkey takes about 90 minutes to roast and produces the juiciest meat with insanely delicious crispy skin. So awesome! We’ll definitely be making this turkey and gravy for our upcoming Thanksgiving, and now that we’ve had a practice run, I think it’s going to be a dialed-in success. Fingers crossed!
I hope you enjoy your spatchcocking experience, and please let me know how it goes!

Spatchcocked Turkey with Anise and Orange
(View original recipe from Bon Appetit)
- 5 teaspoons aniseed
- ½ cup kosher salt
- ¼ cup finely grated orange zest, plus 4 wide strips orange zest
- 2 tablespoons dark brown sugar
- 1 tablespoon coarsely chopped fresh rosemary, sprig reserved
- 1 tablespoon fresh thyme leaves, sprigs reserved
- 2 teaspoons freshly ground black pepper
- 1 12–14-lb. turkey (neck, giblets, and backbone removed and reserved)
- 2 medium onions, quartered
- 4 large carrots, peeled, halved
- 4 celery stalks
- 3 heads garlic, halved
- ½ cup olive oil
Directions:
1. Toast aniseed in a dry small skillet over medium heat, tossing occasionally, until fragrant, about 3 minutes. Let cool; finely grind in a spice mill or a mortar and pestle. (Alternatively, chop with a knife.) Finely chop salt, grated zest, sugar, chopped rosemary, thyme leaves, pepper, and 4 tsp. aniseed in a food processor.
2. Place turkey, skin side down, on a cutting board. Use a knife to score down long oblong bone in the center of breast. Turn skin side up and press down on breastbone to flatten. You should hear a crack and feel the bones give way. Rub all over with salt mixture; place turkey, skin side up, on a wire rack set inside a rimmed baking sheet and chill, uncovered, 6–18 hours.
3. Preheat oven to 450°. Arrange onions, carrots, celery, garlic, and thyme and rosemary sprigs in a roasting pan. Rinse turkey, pat dry, and place, skin side up, on top of vegetables; let sit at room temperature 30 minutes.
4. Meanwhile, heat oil, orange zest strips, and remaining aniseed in a small saucepan until oil is sizzling, about 2 minutes; let cool slightly. Brush turkey with oil, add ½ cup water to pan, and roast turkey 30 minutes. Reduce oven temperature to 350° and continue to roast, brushing with oil every 20 minutes, until skin is deep golden brown and crisp and an instant-read thermometer inserted into thickest part of thigh registers 165°, about 1 hour longer. Transfer to a platter; tent with foil and let rest at least 30 minutes before carving.
Hugs,
Erin


